Cookbook
Common patterns and recipes for react-native-config-ultimate.


Note: Most recipes assume the default RN template (single scheme/target on iOS, no flavors on Android) unless stated otherwise.
Compatibility: These recipes work with both Old and New Architecture (TurboModules). Tested with React Native 0.73+ and React 18/19.
Table of Contents
- Application name
- Bundle identifier
- Deeplink
- Using multiple schemes (ios)
- Using multiple flavors (android)
- Generate fastlane dotenv
- Override native values in js
- Access env vars from native Swift code
- Apply rncu.gradle in monorepos and pnpm projects
Application name
Set different app names per environment (Dev, Staging, Production).
1. Define in your env file
# .env.yaml
APP_NAME: MyApp Dev
Or for per-platform names:
# .env.yaml
APP_NAME:
  ios: MyApp Dev
  android: MyApp Dev
  web: MyApp (Development)
2. Generate config
npx rncu .env.yaml
3. Configure iOS
- Open Xcode
- Go to Info tab
- Find Bundle Display Name
-
Replace it with
${APP_NAME}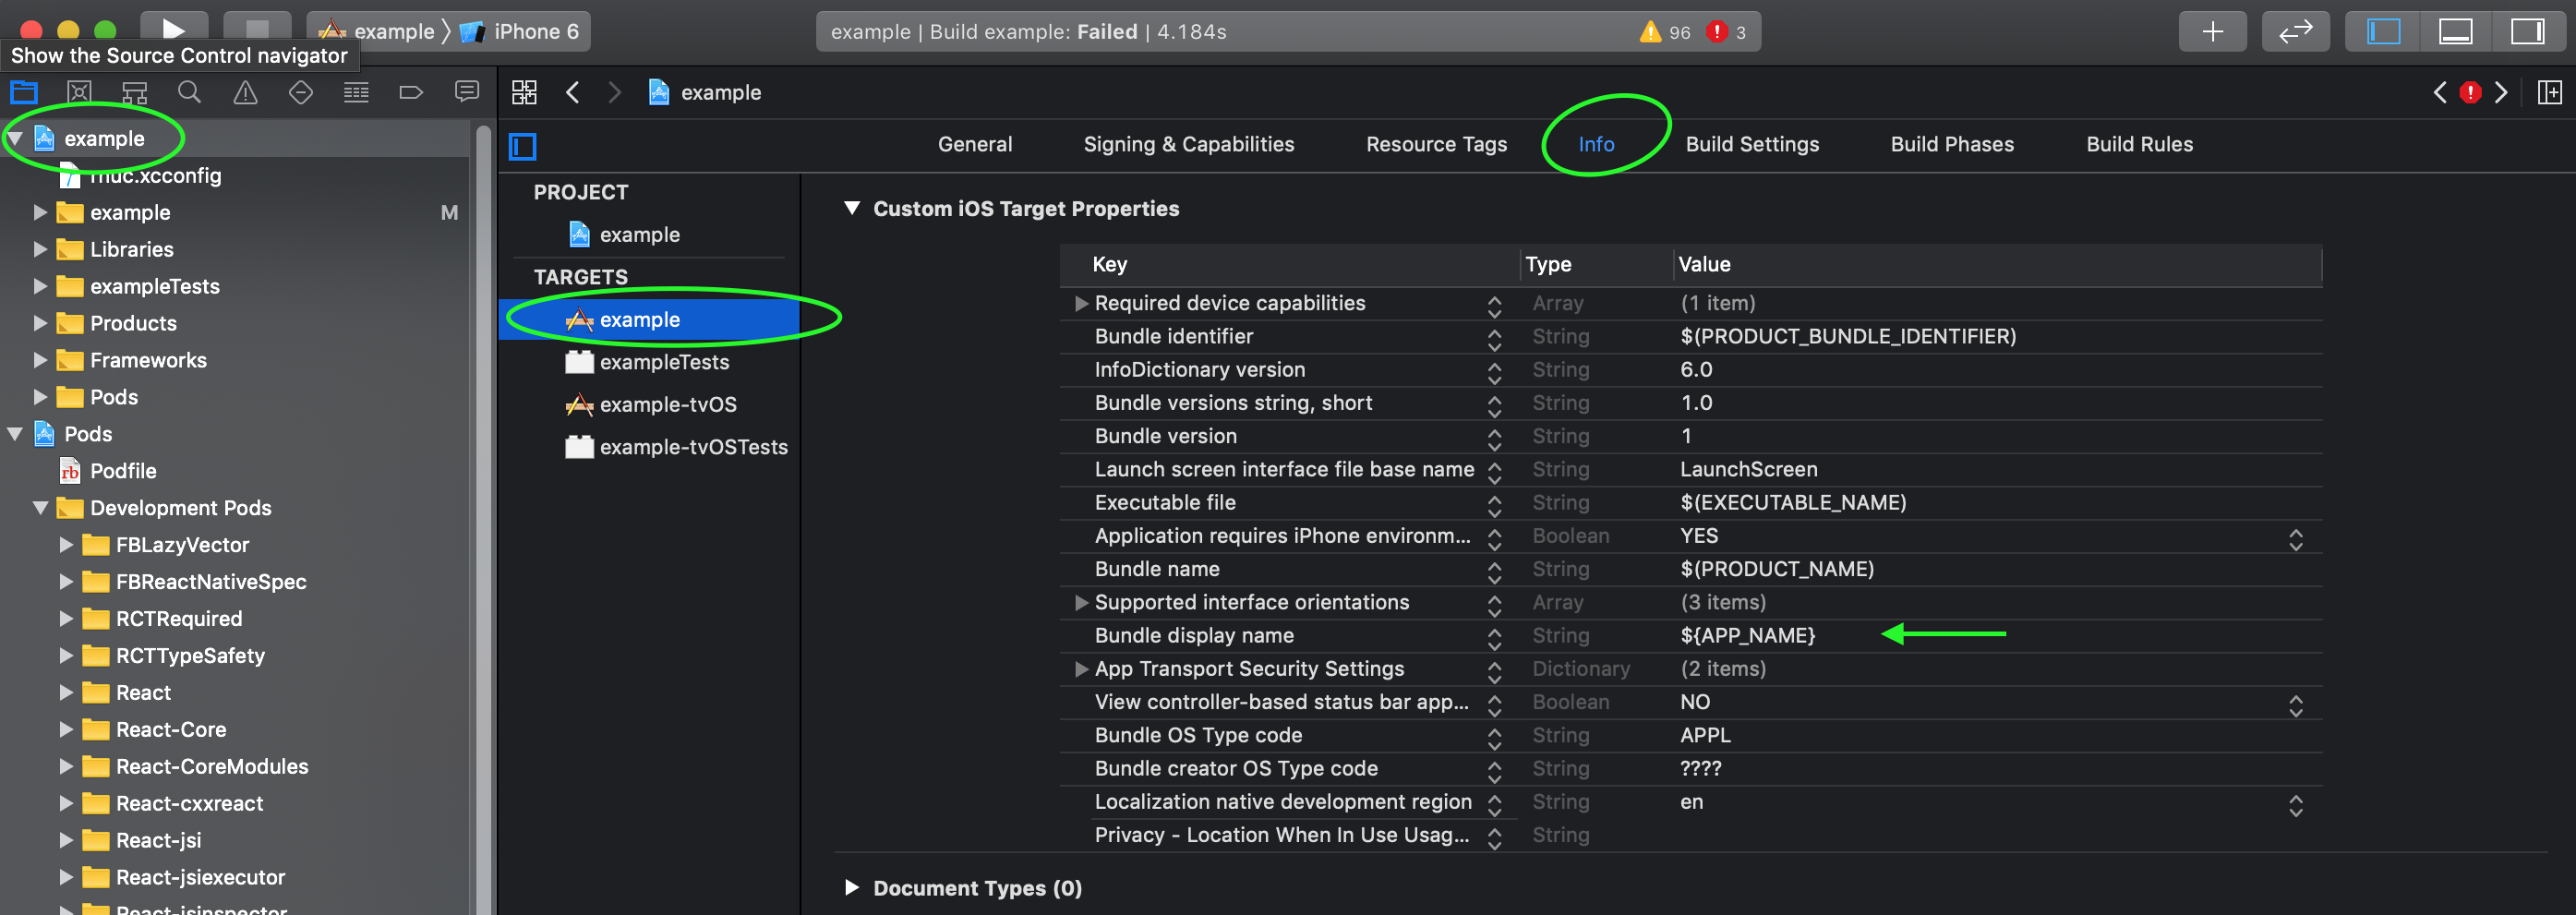
-
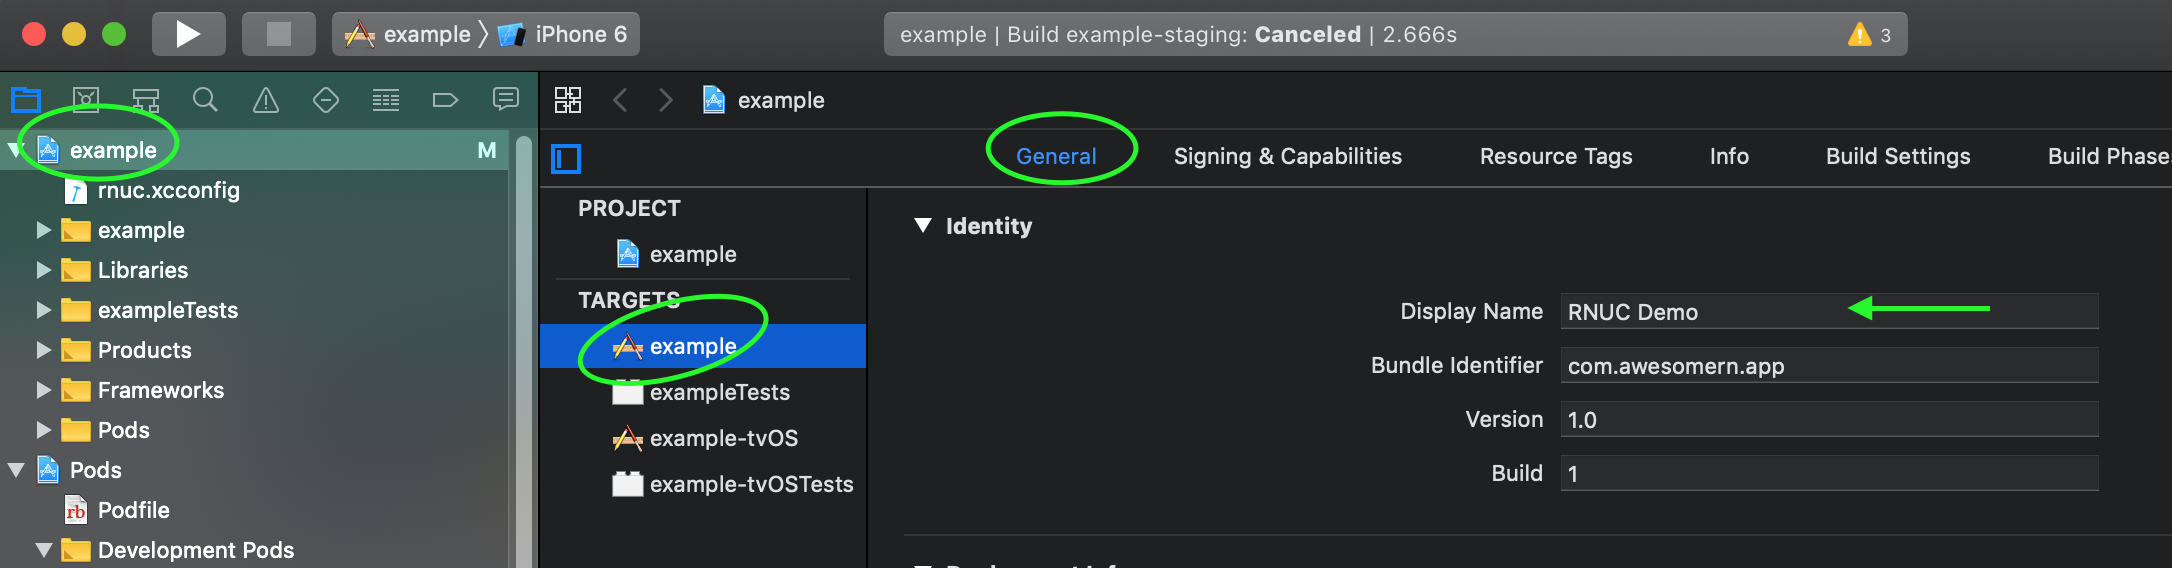
Build and verify the app name changed
4. Configure Android
Edit android/app/src/main/AndroidManifest.xml:
Option A: Using string resource
<manifest>
    <application
        android:label="@string/APP_NAME">
    </application>
</manifest>
Option B: Using manifest placeholder
<manifest>
    <application
        android:label="${APP_NAME}">
    </application>
</manifest>
Bundle identifier
Set different bundle IDs per environment to allow multiple app versions on the same device.
1. Define in your env file
# .env.dev.yaml
BUNDLE_ID: com.mycompany.myapp.dev

# .env.staging.yaml
BUNDLE_ID: com.mycompany.myapp.staging

# .env.prod.yaml
BUNDLE_ID: com.mycompany.myapp
2. Generate config
npx rncu .env.dev.yaml # or your target environment
3. Configure iOS
- Open Xcode
- Go to Build Settings tab
- Find PRODUCT_BUNDLE_IDENTIFIER
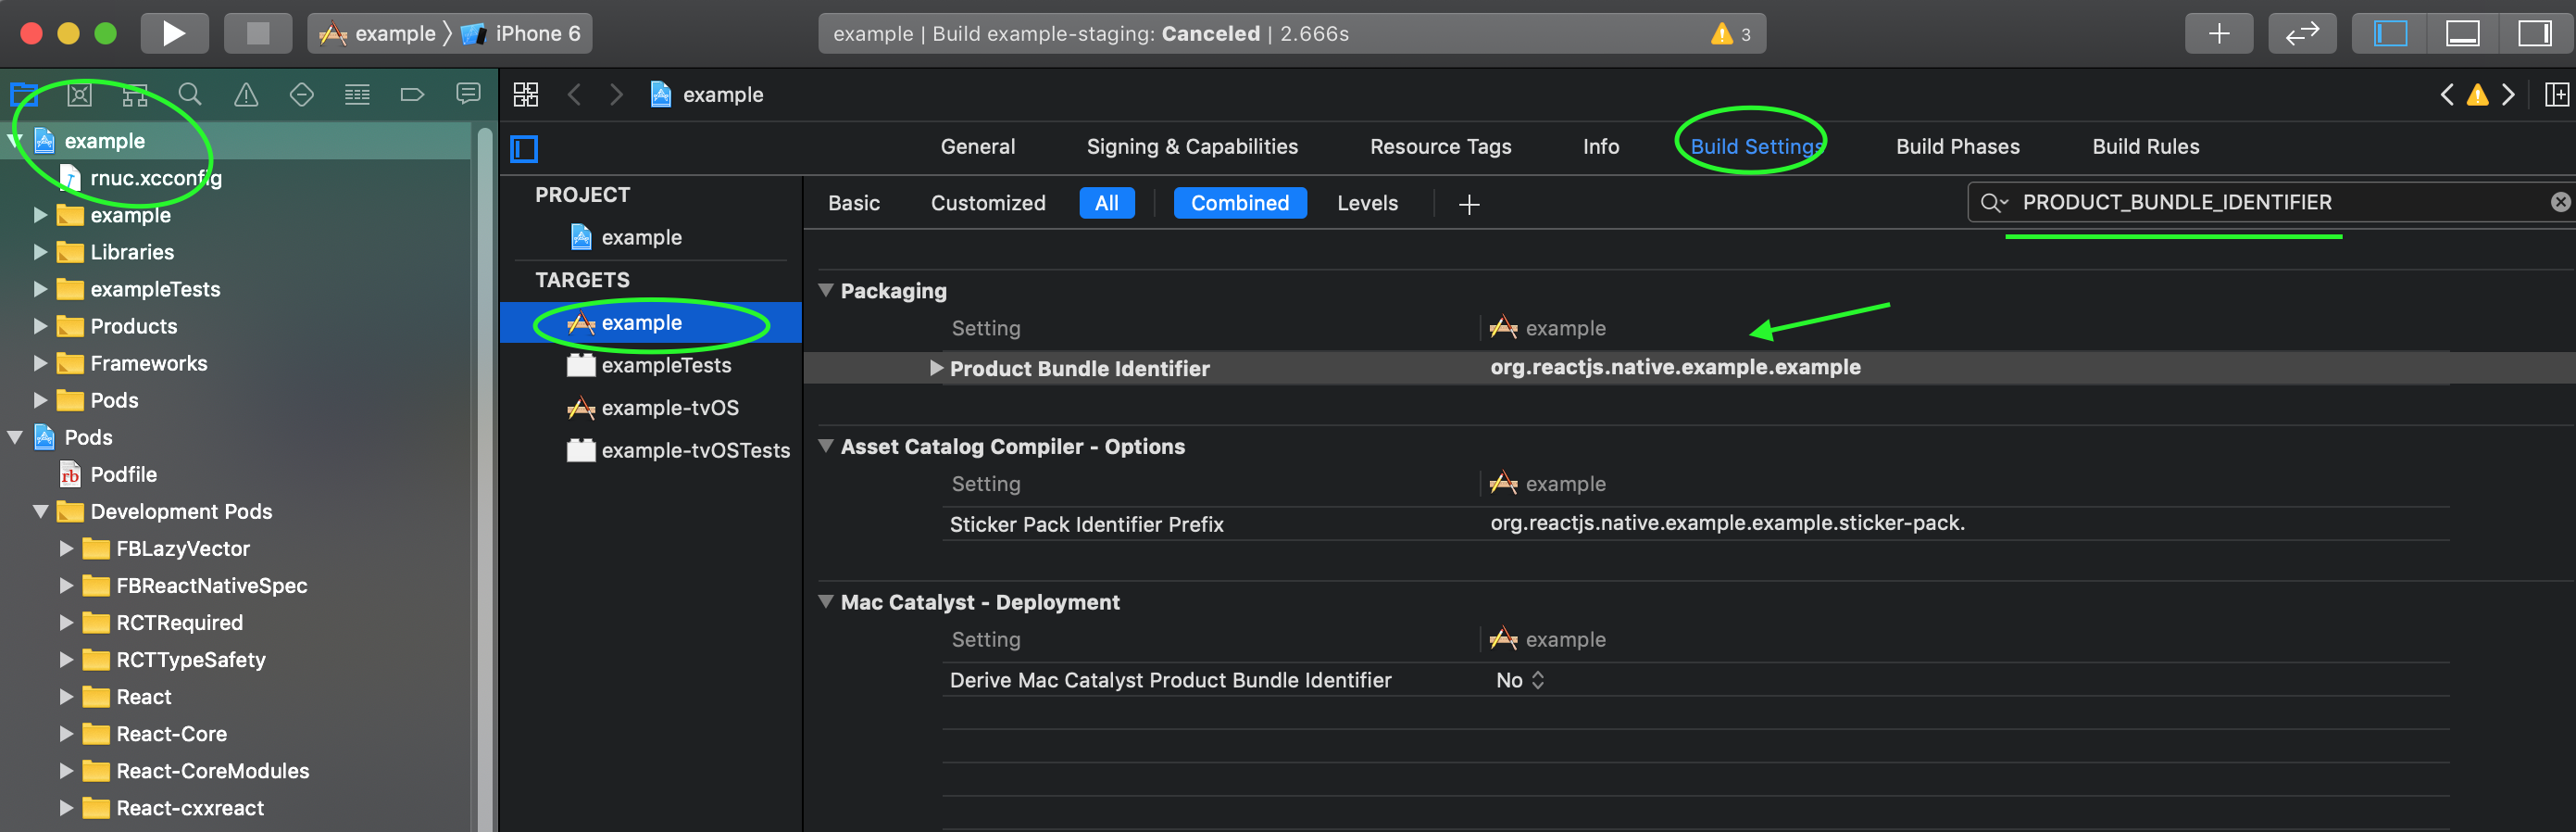
- Replace it with
${BUNDLE_ID}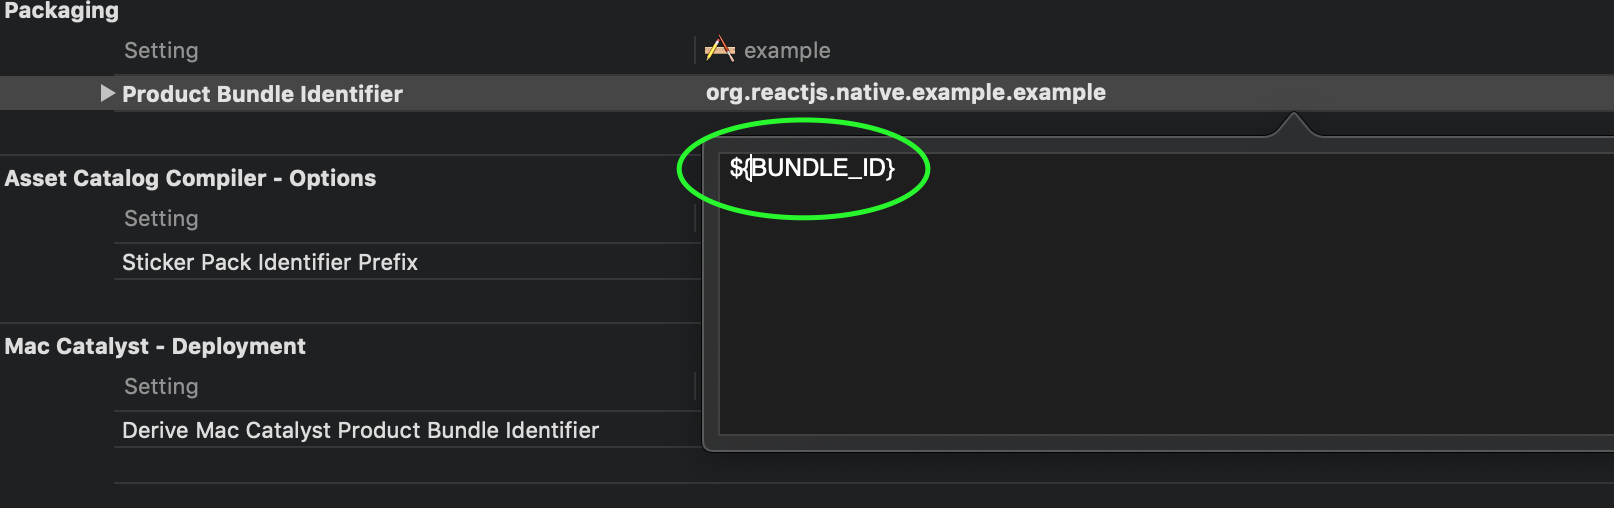
- Verify the bundle ID changed

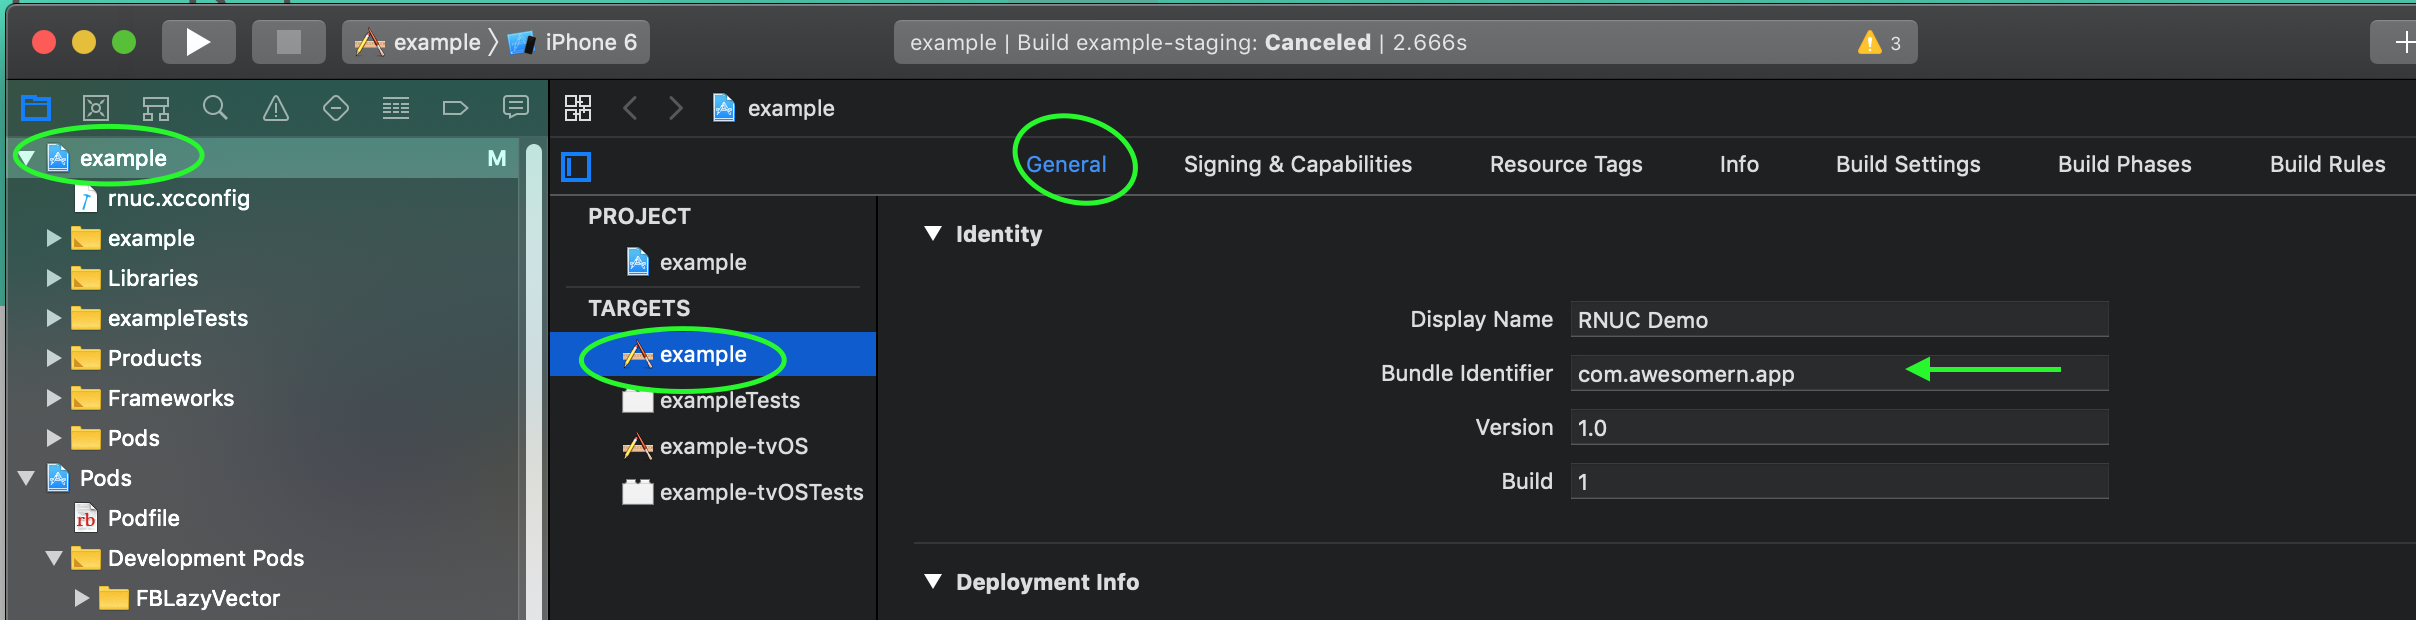
4. Configure Android
Edit android/app/build.gradle:
android {
    defaultConfig {
        applicationId project.config.get("BUNDLE_ID")
        // ...
    }
}
Deep Links
Configure custom URL schemes for deep linking (e.g., myapp://profile/123).
1. Define in your env file
# .env.yaml
DEEPLINK_SCHEME: myapp

# Per-environment deep links
# .env.dev.yaml
DEEPLINK_SCHEME: myapp-dev

# .env.prod.yaml
DEEPLINK_SCHEME: myapp
2. Configure iOS
- Open Xcode
- Go to Info tab
- Find URL Types section and click +
- In the URL Schemes field, enter
${DEEPLINK_SCHEME}
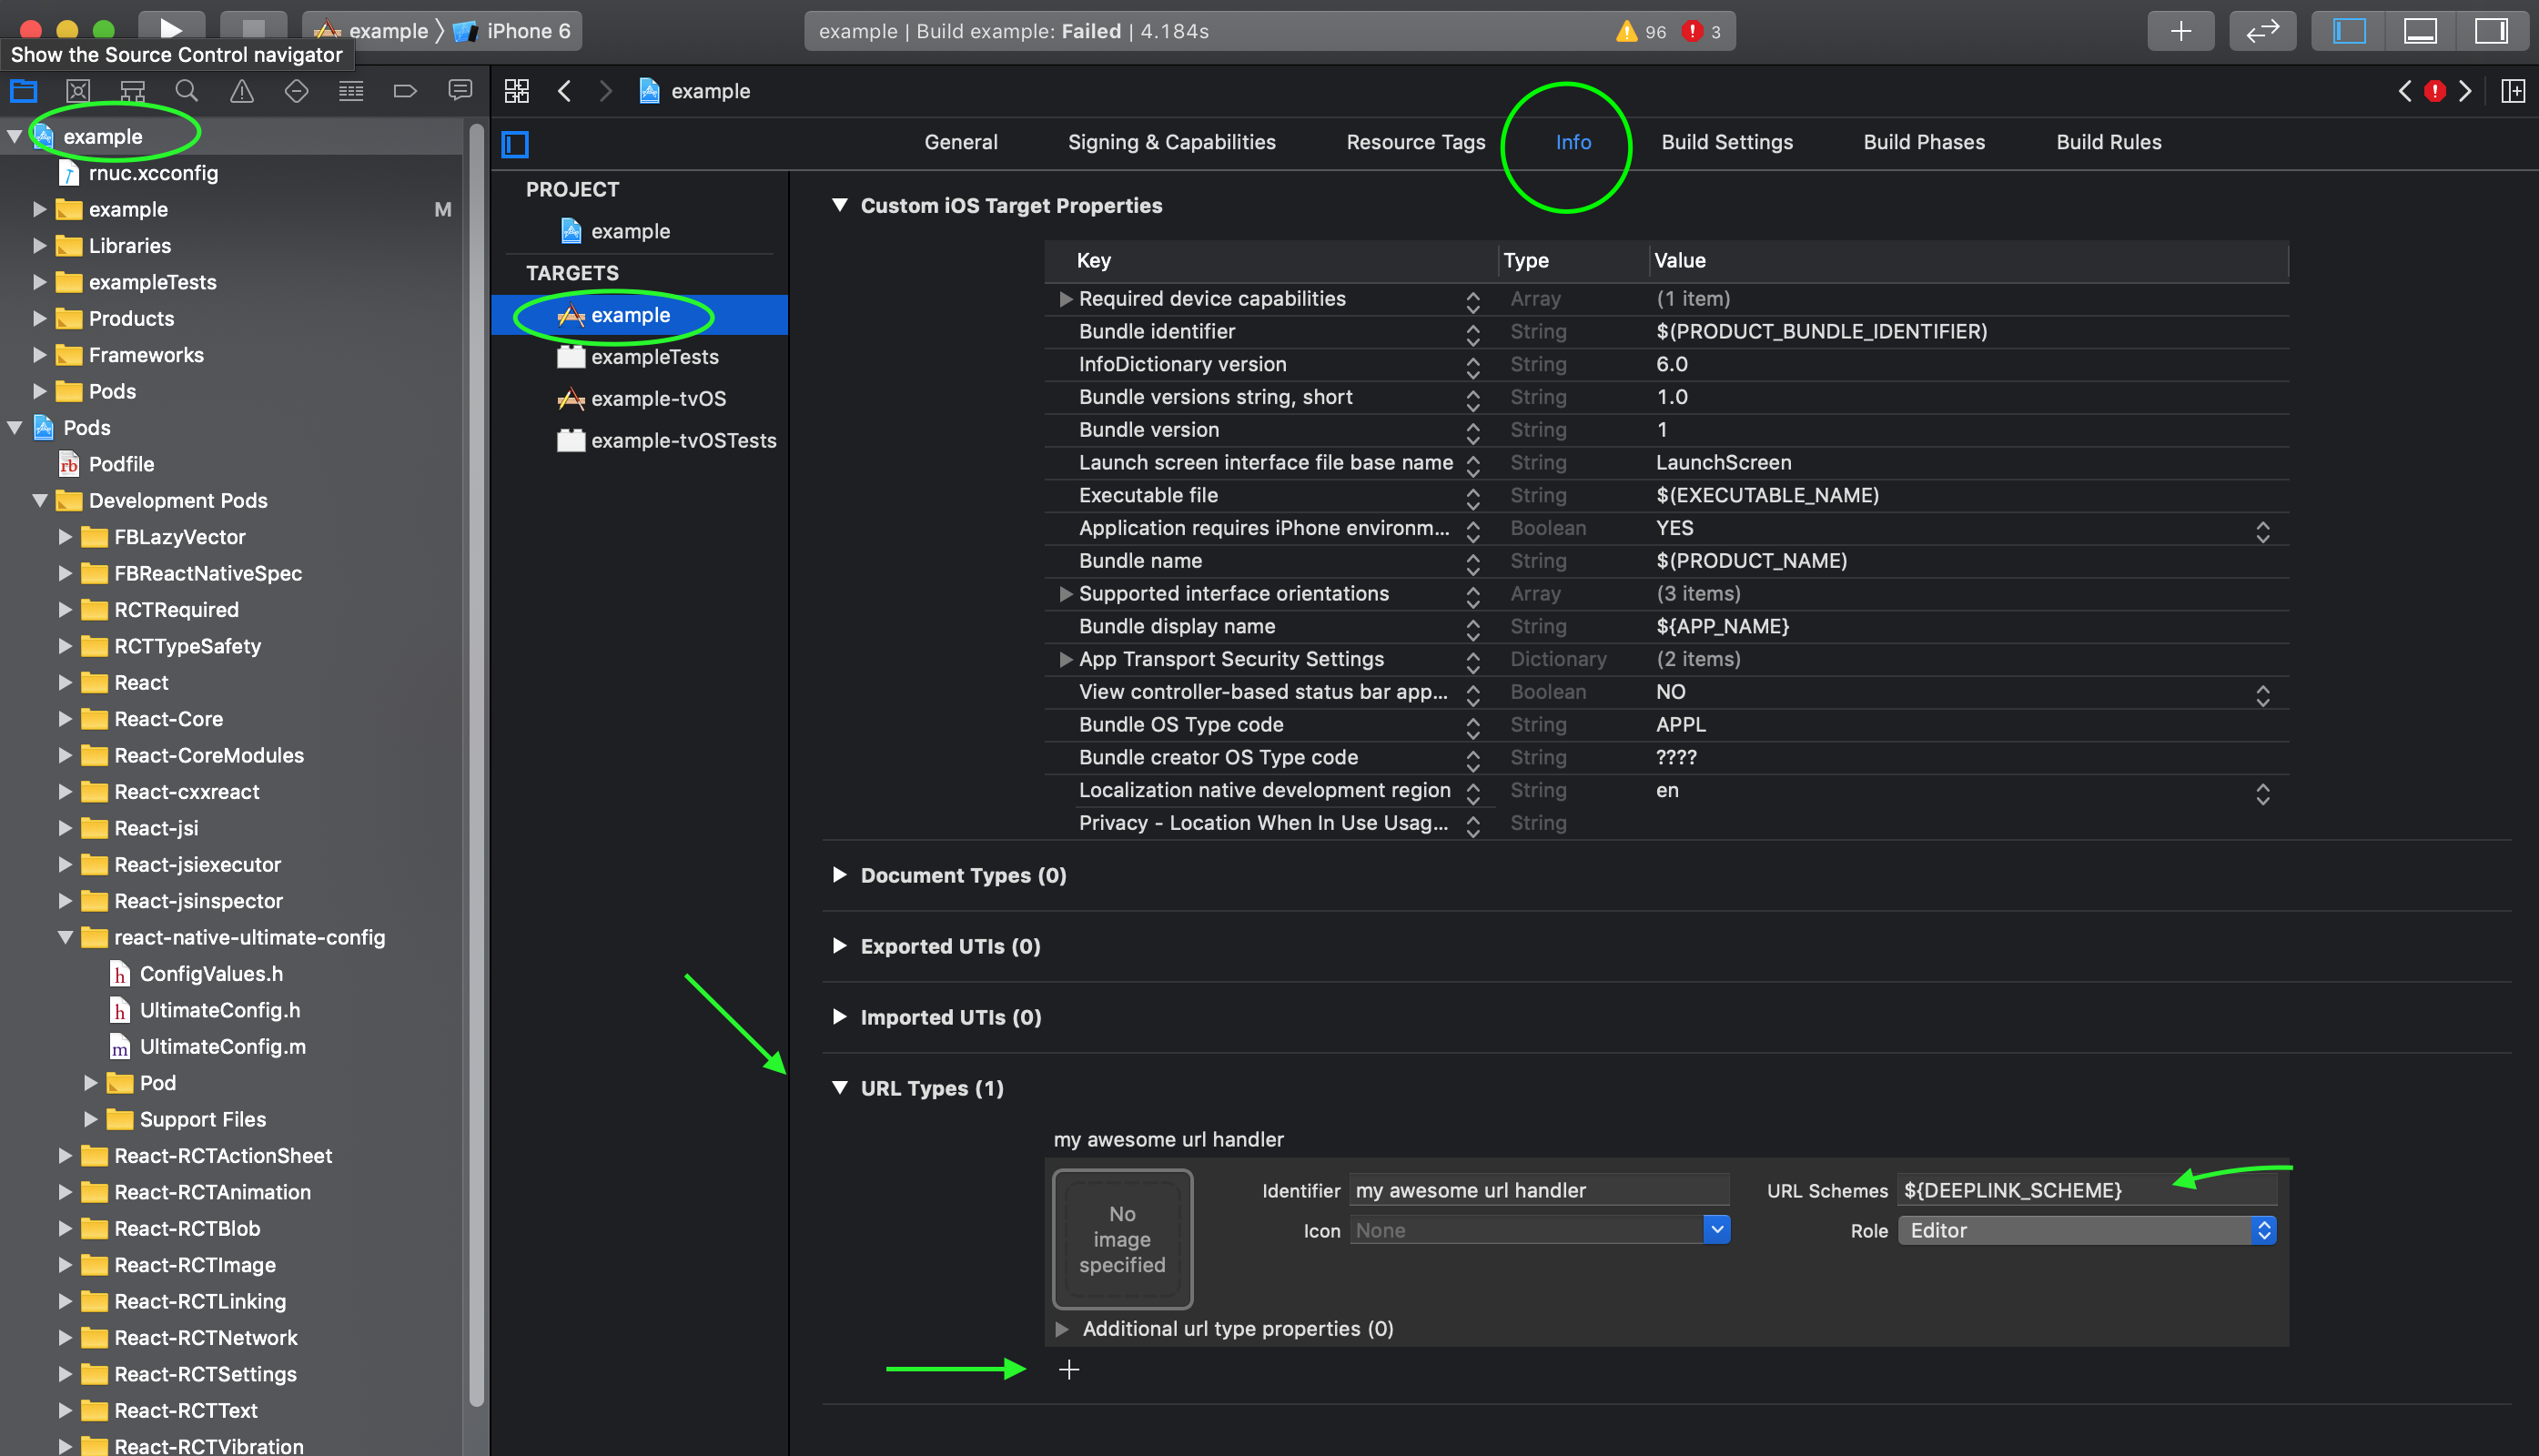
3. Configure Android
See Android Deep Linking Guide.
Edit android/app/src/main/AndroidManifest.xml:
<activity
    android:name=".MainActivity"
    android:launchMode="singleTask">
    <intent-filter>
        <action android:name="android.intent.action.VIEW" />
        <category android:name="android.intent.category.DEFAULT" />
        <category android:name="android.intent.category.BROWSABLE" />
        <data android:scheme="${DEEPLINK_SCHEME}" />
    </intent-filter>
</activity>
4. Test Deep Links
# iOS Simulator
xcrun simctl openurl booted "myapp://profile/123"

# Android Emulator
adb shell am start -a android.intent.action.VIEW -d "myapp://profile/123"
Using multiple schemes (ios)
️❗❗❗This recipe has experimental support and may not cover all edge cases. If your project is using multiple schemes you may still use library via cli without this recipe.
⚠️️⚠️️⚠️️ With this approach xcode project remains uninitialized until you build it first time. Until project is built some UI elements may dispay empty values (like app name or bundle id)
⚠️️⚠️️⚠️️ While this approach is suitable in certain scenarios make sure you know exactly why do you need multiple schemes in first place. This library lets you avoid creating unnecessary native schemes/targets in many scenarios.
Using multiple schemes it is possible to avoid using cli tool manually when building specific environment. This is possible by defining pre-build script phase in a scheme.
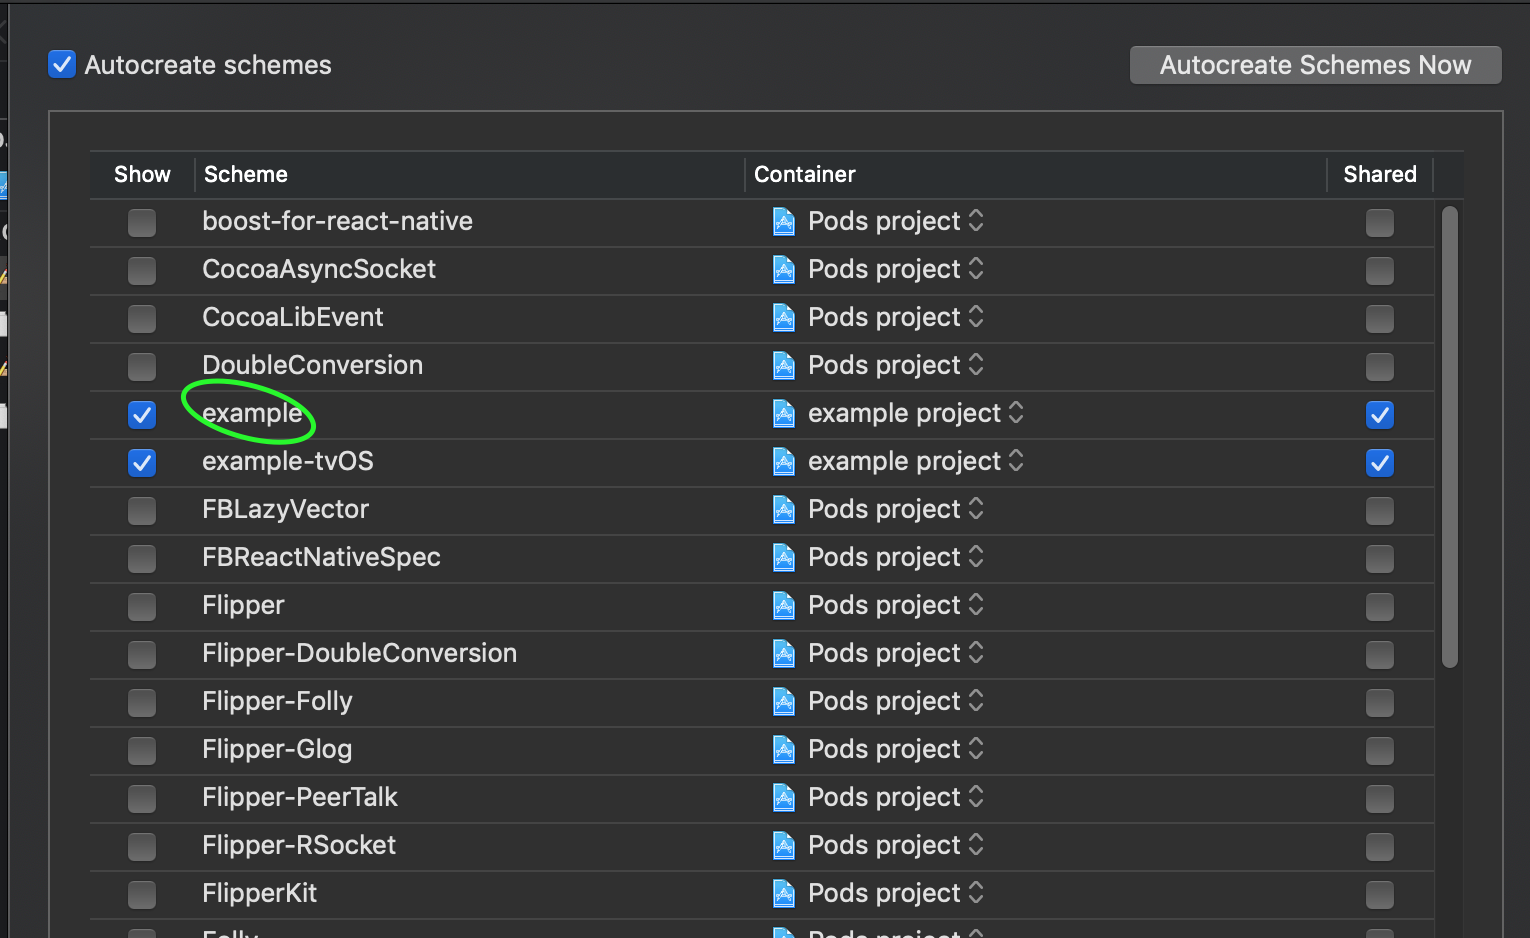
-
open schemes of the project
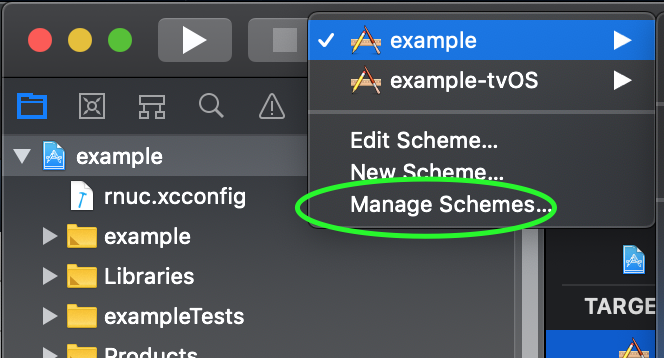
-
ensure scheme is shared (otherwise it will not be committed)
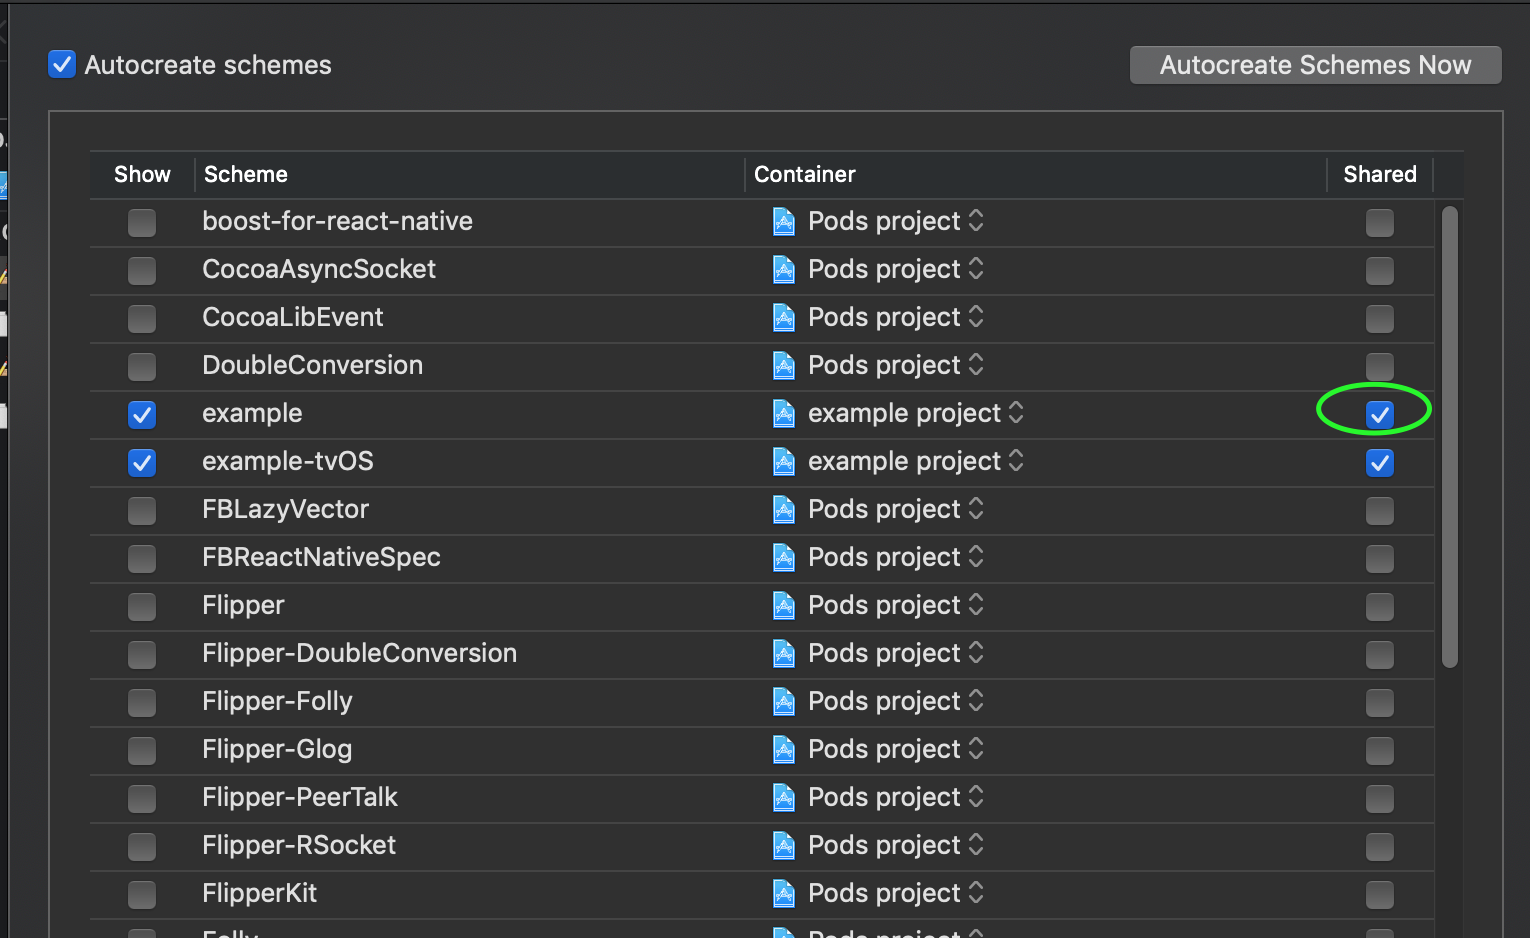
-
go to scheme details
- add Script “Pre-action” for “Build” action. ⚠️ make sure to select “Provide build settings from..”
-
paste the following code
if [ -d "$HOME/.nvm" ]; then
    export NVM_DIR="$HOME/.nvm"
    [ -s "$NVM_DIR/nvm.sh" ] && \. "$NVM_DIR/nvm.sh" # This loads nvm
fi

RN_ROOT_DIR=$(dirname "$PROJECT_DIR")

cd "$RN_ROOT_DIR"
yarn run rncu ".env.yaml"
#or
#npm run rncu ".env.yaml"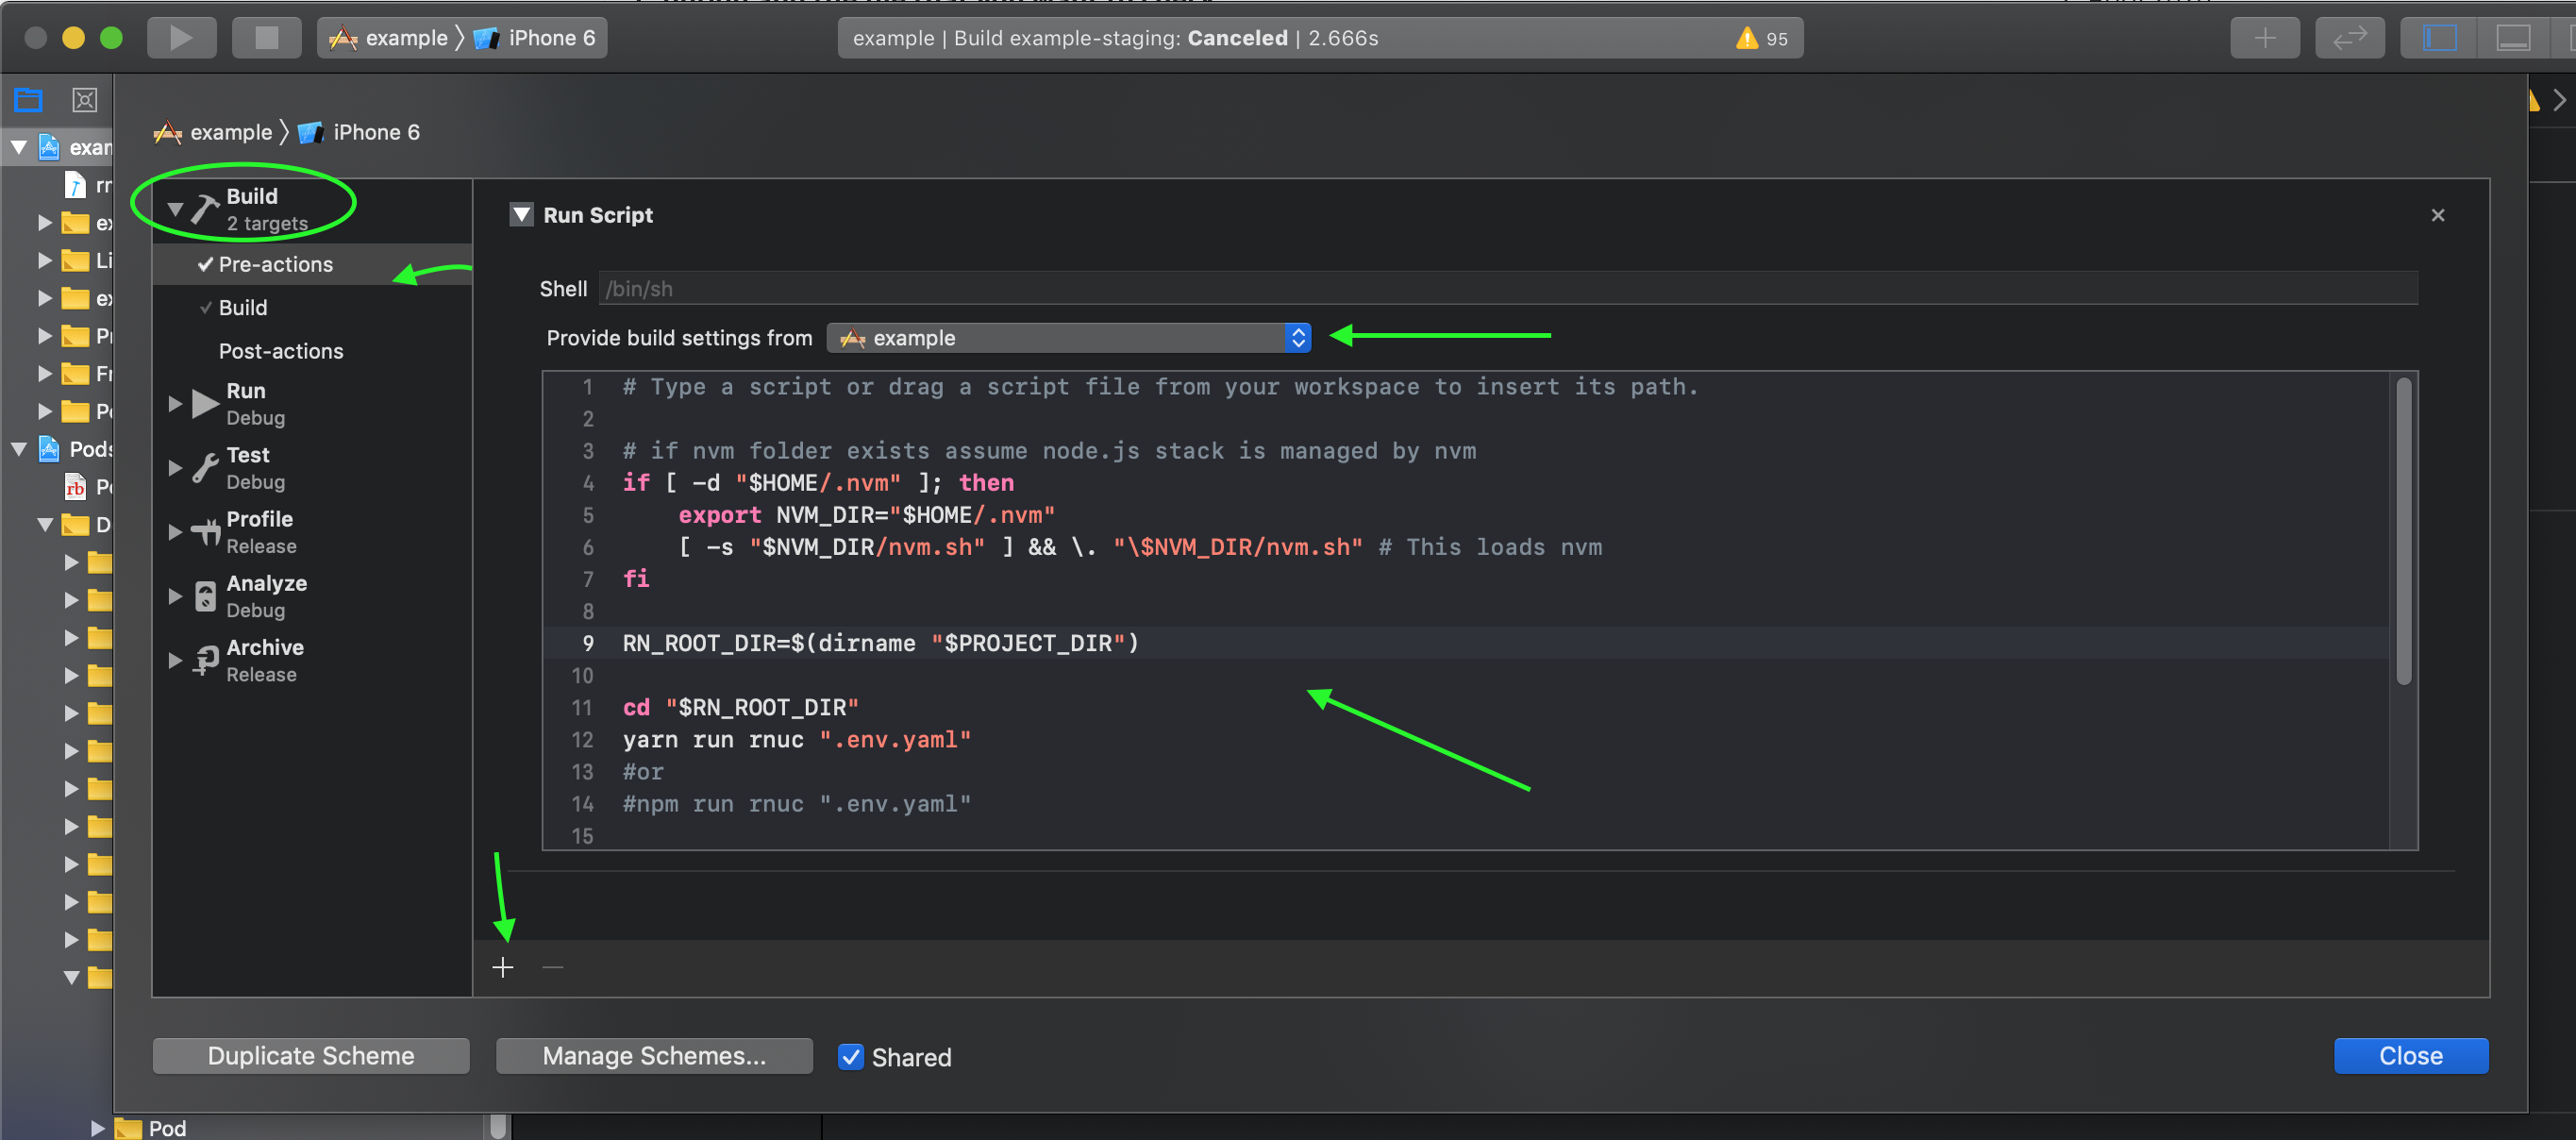
- you can now duplicate scheme per every environment you use and change name of the file that is used for
rncucommand.
Using multiple flavors (android)
️❗❗❗This recipe has experimental support and may not cover all edge cases. If your project is using multiple flavors you may still use library via cli without this recipe. ️❗Typescript typings are not available for this setup at the moment.
⚠️️⚠️️⚠️️ While this approach is suitable in certain scenarios make sure you know exactly why do you need multiple flavors in first place. This library lets you avoid creating unnecessary native flavors in many scenarios.
Assuming you want to support multiple flavors of the app: “dev” and “staging”.
-
Define flavor => env mapping in
android/app/build.gradleproject.ext.flavorEnvMapping = [ dev: "../.env.yaml", staging: "../.env.staging.yaml" ]️️⚠️️ only yaml files are supported here
-
Define some flavors (or you may already have them defined)
flavorDimensions "default" productFlavors { dev{ } staging{ } } -
Done. If you run
(cd android; ./gradlew assembleDebug)it will properly pick up all configs per flavor names. Whenever gradle is configuring tasks it will read env data from files and populate resources, build config and manifest placeholders from them.
Generate fastlane dotenv
- Create rc file
touch .rncurc.js -
Add hook code:
const fs = require("fs");
module.exports = {
  on_env: async function (env) {
    if (fs.existsSync("./ios/fastlane")) {
      const writer = fs.createWriteStream("./ios/fastlane/.env");
      for (const key in env) {
        writer.write(`${key}=${env[key]}\n`);
      }
      writer.close();
    }
    // repeat for android
  },
};
Override native values in js
Sometimes you may need to make config values generated in javascript as opposed to consuming them from native. For example if you want to benefit from fast code reload (without recompilation) with metro or to use over-the-air deploys with services like codepush.
This can be achieved with rc config: js_override:
// .rncurc.js
module.exports = {
  js_override: true,
};
In this case react-native-config-ultimate will embed all config values
into javascript code overriding values from native.
NOTE: This feature does not apply to web projects which do not use native values
either way. See the quickstart guide for help configuring
react-native-config-ultimate for use in a web project.
Access env vars from native Swift code
Use this recipe when you need to read config values directly from native Swift code — for example to configure a native SDK before the JS bridge starts, or in a Swift-only extension target.
This approach uses the iOS Build Settings chain (rncu.xcconfig → Info.plist → Bundle)
and requires no bridging header.
Prerequisites
rncu.xcconfigis already wired to your project’s base configuration (see quickstart).- The variable you want to expose exists in your
.envfile and you have runnpx rncu .envat least once.
1. Expose the variable through Info.plist
Add an entry for each variable you want in ios/<YourApp>/Info.plist:
<key>API_URL</key>
<string>$(API_URL)</string>
Xcode expands $(API_URL) at build time from the value injected by rncu.xcconfig.
You do not need to add every variable — only those you need in native Swift.
2. Create Config.swift
Create ios/<YourApp>/Config.swift:
import Foundation

/// Type-safe access to environment variables defined in `.env`.
///
/// Values are injected at build time by `react-native-config-ultimate` via `rncu.xcconfig`.
/// Each variable is resolved through `Info.plist` using Xcode's `$(KEY)` build setting expansion.
///
/// **Workflow when adding a new variable:**
/// 1. Add the key to `.env`
/// 2. Run `npx rncu .env` to regenerate `rncu.xcconfig`
/// 3. Add `<key>YOUR_KEY</key><string>$(YOUR_KEY)</string>` to `Info.plist`
/// 4. Add a static property here: `static let yourKey: String = value(for: "YOUR_KEY")`
enum Config {
    static let apiUrl: String = value(for: "API_URL")
}

// MARK: - Private

private func value(for key: String) -> String {
    guard
        let raw = Bundle.main.object(forInfoDictionaryKey: key) as? String,
        !raw.isEmpty
    else {
        fatalError("""
            [Config] Missing or empty value for key '\(key)'.
            → Did you run `npx rncu .env`?
            → Is '\(key)' added to Info.plist as <string>$(\(key))</string>?
            """)
    }
    return raw
}
3. Register Config.swift in Xcode
Add the file to your Xcode project:
- In Xcode’s project navigator, right-click the
<YourApp>group → Add Files to… - Select
Config.swift - Make sure Target Membership is checked for your app target
4. Use it anywhere in native Swift
// In AppDelegate, a native module, or any Swift file
let url = Config.apiUrl
Data flow summary
.env
  ↓ npx rncu .env
rncu.xcconfig  (API_URL=https://api.example.com)
  ↓ Project-level base configuration
Build Settings  (API_URL=https://api.example.com)
  ↓ Xcode build setting expansion
Info.plist  (<key>API_URL</key><string>$(API_URL)</string> → "https://api.example.com")
  ↓ Bundle.main
Config.swift  (static let apiUrl = value(for: "API_URL"))  →  "https://api.example.com"
Tip: Add only the variables you actually need in Swift to
Info.plist. All variables are already available to JS via the normal bridge — this pattern is specifically for native Swift code that runs before or outside the JS context.
Apply rncu.gradle in monorepos and pnpm projects
The quickstart guide shows the default way to apply the
Gradle plugin. However, hardcoded relative paths like ../../node_modules/... break
in setups where node_modules is not co-located with the project root (pnpm with
node-linker=hoisted, Yarn workspaces, nested monorepos, etc.).
The problem
// ❌ Breaks if node_modules is not two levels up
apply from: "../../node_modules/react-native-config-ultimate/android/rncu.gradle"
The solution
Use Gradle’s built-in project resolution instead:
// ✅ Works regardless of where node_modules lives
apply from: project(':react-native-config-ultimate').projectDir.getPath() + "/rncu.gradle"
This tells Gradle to ask the already-resolved :react-native-config-ultimate project
where it lives on disk, so the path is always correct.
When to use each form
| Setup | Recommended form |
|---|---|
Default RN template, npm/yarn, flat node_modules |
Either form works |
pnpm with node-linker=hoisted |
project(':...') form |
| Yarn workspaces / monorepo | project(':...') form |
| Nested monorepo (app inside packages/) | project(':...') form |
pnpm note: pnpm’s default virtual store layout (
node-linker=isolated) is not compatible with CocoaPods ≥ 1.16. Usenode-linker=hoistedin your.npmrcwhen working with iOS projects.
Related
- Quickstart — Installation and setup
- API Reference — Full CLI options and native access
- Monorepo Tips — pnpm, yarn workspaces, Lerna, Nx
- Troubleshooting — Common issues and solutions